 Introducing how to create a database in Notion.
I created a page to manage articles on Hatena Blog with Notion's database.
I will organize how to make it at that time and introduce how to create a database in Notion.
The database that was actually created is introduced separately in a demo article and an article on how to use it.
Please have a look if you like.
Notion related articles in Japanese
Sorry. It is still written in Japanese. You can translate with some Translate site by entering the url of the article.
Table of contents
- Overview
- Creation flow
- Property
- View
- Item
- Aggregation (Calculations)
- About Notion
- Sign up for Notion
- Disclaimer
- Finally
- Reference
Overview
I often see articles that say Notion is pretty useful.
As I read the article, I became interested in the database feature.
So, I actually tried using Notion myself.
I have briefly summarized the experience, so I will introduce it.
I think it's okay with the image of making an Excel sheet.
Creation flow
Roughly speaking, Notion is to create a new page like a binder note and enter what you want to write like a memo there.
The database feature is like creating an address book in one page created in a binder notebook.

 Creation flow
Create a new page
Just click "Add a page" at the bottom of the sidebar on the left side of the screenMake a page a table
Just click "Table" on the screen that appears
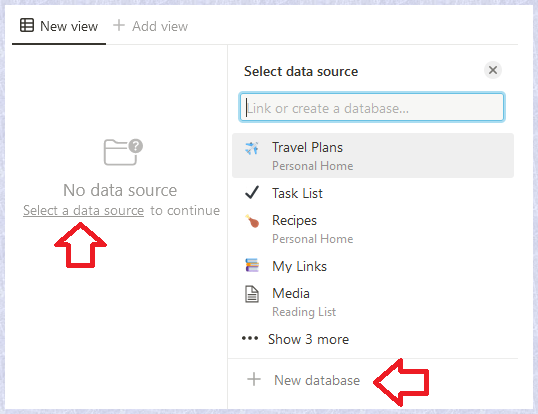
Click, then the table view will be created and displayedSelect data source
If selecter is not displayed, click "Select a data source"
Click "New database"
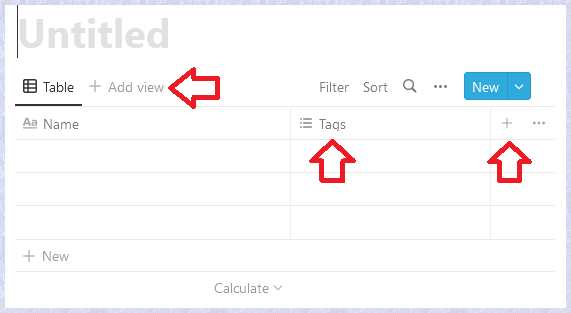
Add property to table
Add what you want to display as a column as a property, like an Excel tableAdd view
By default, it only has a display format like an Excel table, so add another display format as needed.
* Table view
Property
Properties are the columns that appear in the table view.
Properties can be hidden in the view later.
First, define it in the table view without hiding it.
The procedure for adding a property is explained below.
Add property

 Click the "+" in the column heading. Then add the property.
When the screen for defining the property is displayed, enter the name and select the type.
- Property name
- Property type
* "Name" in the table view is the name of the item (one line) and the word "Name" can be changed by clicking.
* Similarly, "Tags" is a property that is provided in the table view from the beginning, and you do not need to use it as it is, you can modify and delete it.
Basic property type
- Text : strings
- Number : Numeric
- Select : Drop-down menu to select only one
- Multi-Select : Drop-down menu for multiple selection
- Date : Date and time(a date or a date range)
- Person : Lets you mention other users in your workspace
- Files & Media : Upload files or links such as images
- Checkbox : Checkbox
- URL : URL(Click to display the link)
- Email : Email address(Click to launch your email client)
Phone : Telephone number(Click to launch the phone app to make a call on your phone or computer)
I haven't investigated the workspace.
Reference : Intro to databases(help site)
Delete property
 You can delete the property if you no longer need it or make a mistake.
Click the column heading in the table view and select "Delete property" in the dialog.
Modify property
 To modify the property, click the column heading in the table view.
Then, click the column heading and select "Edit property" in the dialog.
Then, a dialog similar to Add will appear, so you can change the name and type.
View
Views are different ways of displaying properties.
Notion provides some template, so decide which one you need and add it.
In addition to how to show it, you can specify filters and sorts as a view, so I think it's a good idea to create a view as a condition that you often use.
Hint
Enter some data with the properties created before creating the view.
If you create a view with data, it will be easier to imagine the view.
If it's not a hassle, try using all view types.
Deleting a view is also easy.
By the way, the more data you have, the easier it is to imagine.
Add view

 Click "Add view" in the table view. This will bring up a dialog for creating the view.
* Once you have created a view Depending on the display area, "Add view" will replace the view choices.
* To add more views, click on the choices and then select "Add view".
- Enter view name
- Select a view type
- Click "Done"
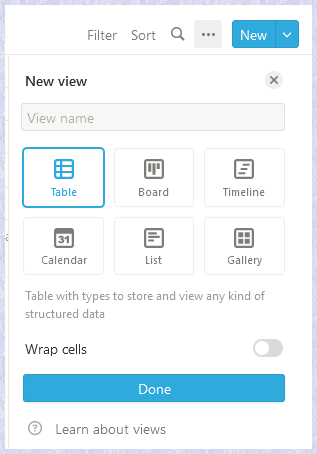
View type
Table : Excel-like tabular view
Columns are properties. One line is called an item.
Good to use when viewing or modifying properties as a list.Board : View grouped by property values
Good to use when checking items in group units such as blog. categories and recipe ingredients.Timeline : View showing the period
Good to use when checking the validity period of an item.
It feels like a Gantt chart.Calendar : View displaying items in calendar format
Good to use when checking items by date.List : Excel-like tabular view
The difference from Table view is that it cannot be modified on the table.
Good to use it when you want to display it as a list.Gallery : View of cards side by side
Good to use when displaying a list of images.
Properties must be of type "Files & Media" to display images.
Reference : Views, filters & sorts
Delete view

You can delete the view if you no longer need it or make a mistake.
Click the view "..." that you want to delete from the view choices and select Delete.
Item
In views other than the table view, one chunk is an item.
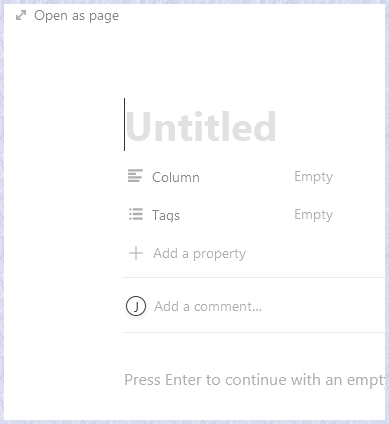
Click an item to display it as a page.(Click the "OPEN" button in the Table view)
Initially, it is displayed as a dialog.
Click "Open as page" to display it as a page.
At the bottom of the item, you can write anything, such as text or figures, just like a regular page.
They are called content.
Notion has a function called Web bookmark that displays the URL like a blog card.
Since Web bookmark cannot be used in Gallery view, there is also a way to describe it here.
Aggregation (Calculations)
Click "Calculate" at the bottom of the column and select the aggregation method.
The options for the aggregation method vary depending on the type of property.
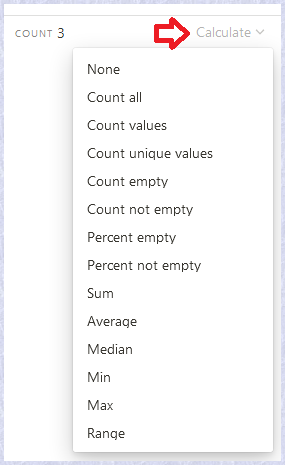
Aggregation options(Calculation options)
- Count All : Total number of rows
- Count Values : Number of values entered(example : Number of categories)
- Count Unique Values : Number of value types in the column(example : Number of category types)
- Count Empty : Number of empty lines
- Count Not Empty : Number of non-empty lines
- Percent Empty : Percentage of empty rows
- Percent Not Empty : Percentage of non-empty rows
- Date format options
- Earliest Date : Oldest date
- Latest Date : Newest date
- Date Range : Difference between oldest date and newest date
- Number format options
- Sum : Total value of column values
- Average : Average of column values
- Median : Median of column values
- Min : Lowest value in the column
- Max : Highest value in column
- Range : The difference between the highest and lowest values in a column
Reference : Table view(Help site)
About Notion
Notion is a project management and note-taking software.
Notion is a software designed to help members of a company or organization coordinate deadlines, objectives, and assignments for the sake of efficiency and productivity. Wikipedia
Sign up for Notion
This site is detailed for Notion sign-up (user registration, sign-in after registration).
Disclaimer
Please check "Disclaimer" before using.
If you have any questions, please contact me from "Contact me".
However, I do not guarantee an answer.
Finally
I introduced how to create a Notion database.
I think it's relatively simple to make.
What to make a property and how to show it in which view.
If you can imagine that, it will surely be a useful tool.
Many samples have already been released in the world.
I also publish it in the article "Manage blog articles (demo) [Notion database]".
I think you can start making from 0.
I think it's okay to start with the published one as it is or after customizing it.
Even if you try it and find that it cannot be used, it will be a learning experience.
update : 2022-09-05
Caution
This article is written with the April 2022 Notion service running in a browser.
Reference
- Notion site : Notion – The all-in-one workspace for your notes, tasks, wikis, and databases.
- Notion Help Center : Reference
- Notion Help Center : Databases
- Sign up : Screenshot of Notion - Sign up