 If you want to easily use Notion's database features, I recommend importing a CSV file.
This CSV import function is quite excellent as a CSV viewer.
I will show you how to use it.
Contents
- Why you should start with CSV import
- You can use board view and gallery view with imported data
- CSV import
- Change property type
- Create view
- Points to note when creating a CSV file to import
- Excellence as a CSV viewer
- Finaly
Why you should start with CSV import
The main reason is that it is easier to visibly arrange the frame (definition of the database) containing the data rather than inserting the data after creating the frame.
After importing, most of the database is ready.
Just change the types of the properties that didn't match in the import and you've got yourself a nice database.
All that's left now is to create the view.
Also, if the frame is created first, the problem is how to insert the data after creation.
Additionally, there are challenges with continually adding data in either case.
One solution is to create a data addition app using the Notion API.
I have introduced how to use the Notion API in another article, so please take a look.
Article : [Practice] How to use Notion API [Python] 🔗
* sorry. It's still in Japanese
Even if you start with a CSV import, you still need an understanding of database functionality.
I have prepared an article that explains how to create a database, so check it out for a deeper understanding.
Article : How to create a database in Notion [Notion database] 🔗
You can use board view and gallery view with imported data
 Of course it depends on the data, but board view and gallery view are one reason to use the Notion database.
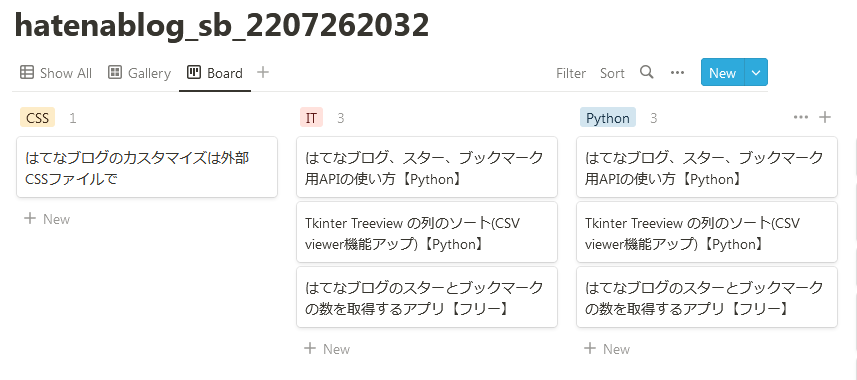
Importing a CSV file will allow you to use Board View and Gallery View with just a few changes.
Notion has a property type called multi-select.
Multiple tags can be specified for multi-select.
In the case of multi-select, you can use the board view to see which tags are classified.
This is one of the useful uses of the Notion database.
 You can also use the file & media type to display images.
If you create a gallery view and specify the file & media type property for the "card view" item, you can display the data including images with thumbnails.
Notion parses the data in columns (properties in Notion) to determine property types when importing a CSV file.
A string is text, a number is a number, a date is a date, a URL is a URL, and so on.
You can change the type of those properties to Multi-Select or Files & Media after importing.
As a result, you will be able to use board view and gallery view.
CSV import
Since it is easy, I will explain the import procedure immediately.
This site is detailed for Notion sign-up (user registration, log-in after registration).
Step by step CSV import
- Click "Import" in the side menu
- Click "CSV" for the type of data to import
- Select file in file selection dialog
- Import is completed when "Uploading" and "Importing" are displayed
- Imported data is displayed and added to the side menu
Illustrated steps

 * As you can see from the image, you can import various other data


Change property type
Notion automatically determines the column (property) type from the data in the loaded CSV file.
Some of them are better to change manually.
Here are two examples to explain how to change the type.
Change type (multi-select)
Here, I will introduce an example of changing the data imported with the type "text" to "multi-select" and specifying a color for the tag.
As a prerequisite for changing to multi-select, create the corresponding column of CSV data as follows.
...,"tag1,tag2,tag3",... (... is an adjacent column)
Step by step type changing
- Click the column heading
- Click "Type" line in the displayed menu
- Click "Multi-Select" in the displayed types
- The type changes and returns to the original display
- Click the column heading again. Click "Edit Properties"
- Click the tag you want to change in the displayed options
- Click the desired color in the displayed colors
- When the color is selected, it is checked and the color of the data changes, so return with Esc
- Repeat until there are no more tags to set
- Finally press Esc to return
Illustrated steps
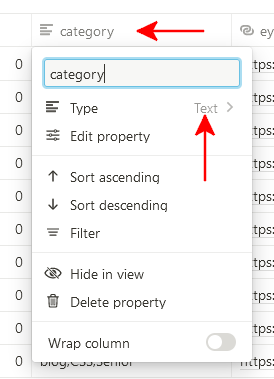 1. Click on column heading
2. Click "Type" line in the menu that appears
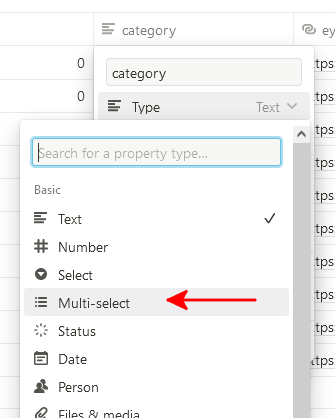
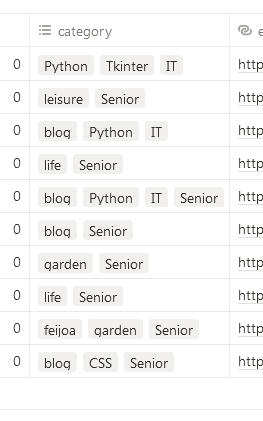
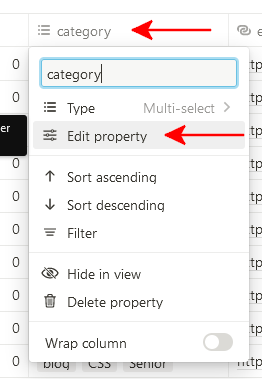 1. Click on column heading
2. Click "Edit Properties" in the menu that appears
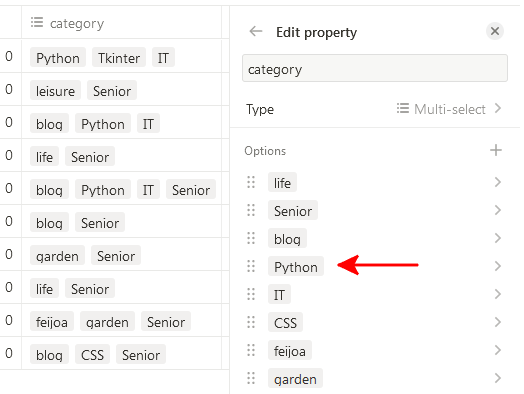

 Press Esc to move to the next tag
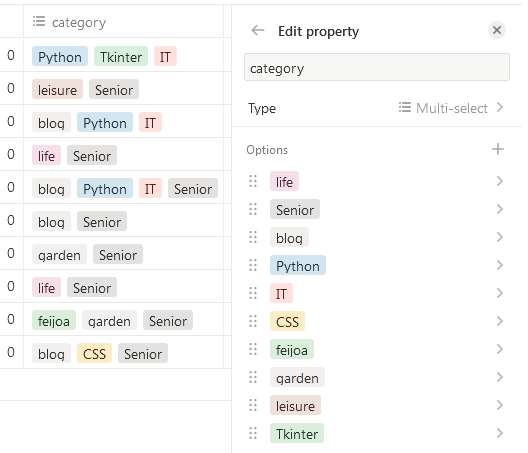 - Repeat the same operation to set the color of each tag
- Press Esc to exit
Change type (File & Media)
Here is an example of changing the type of data imported with "URL" to "File & Media".
Step by step type changing
- Click the column heading
- Click "Type" line in the displayed menu
- Click "File & Media" in the displayed types
Illustrated steps
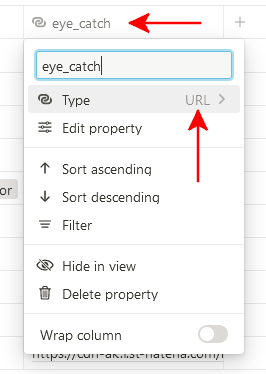 1. Click on column heading
2. Click "Type" line in the menu that appears
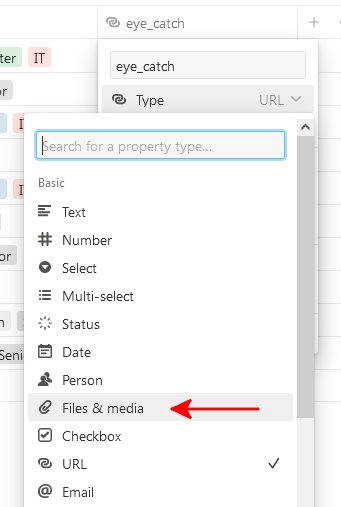

Create view
Now that we've changed the property types, creating a new view will make it look more like a database.
Create a gallery view
Step by step creation
- Click "+" to the right of the view name
* If "+" is not displayed, click "" and click "Add View" - Click "Gallery" for the displayed view selection
- Click "Card Preview"
- Click the property (eye_catch here) in the displayed options.
The property to choose is the file & media type that was set earlier - click "Done"
Illustrated steps
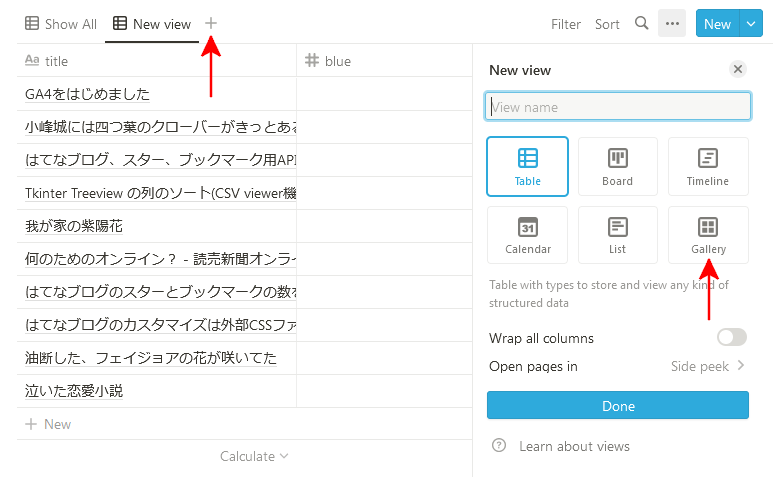 1. Click "+"
2. Click "Gallery"

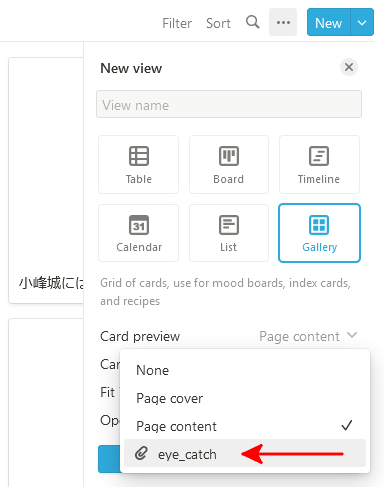

Create board view
Board view is useful for multi-select property types.
Step by step creation
- Click "+" to the right of the view name
- Click "Board" for the displayed view selection
- Check if "Group By" is a multi-select property 1
If not, click to reselect property - Click "Done"
Illustrated steps
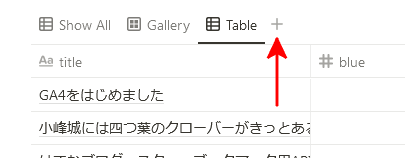 1. Click "+"
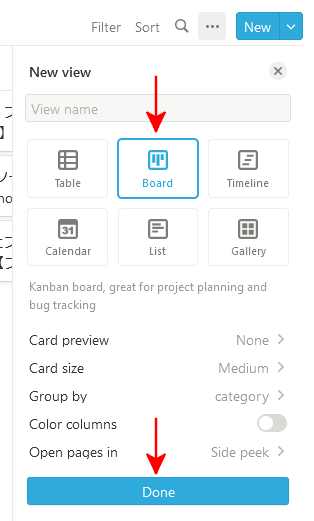 1. Click "Boad"
2. Check if "Group By" is a multi-select property
If not, click to reselect property
3. Click "Done"

Points to note when creating a CSV file to import
For columns that you want to multi-select, enclose the entire column with "
"" and separate the items inside with ","
...,"tag1,tag2,tag3",...(... is an adjacent column)Create the date and time as "Year-Month-Day Hour:Minute:Second"
"Year-Month-Day" is also possible
* Since the specification is unclear, I will introduce what worked.
Excellence as a CSV viewer
 The ability to import CSV files in Notion means that you can also use it as a CSV viewer.
The data is imported into Notion's database so you can see the data in different views.
In other words, there are various display methods and it is excellent as a viewer.
I will explain what is excellent, mainly whether it can do the same as when reading with Excel, and whether it has more features.
- free to use
- URL is linked
- Determine whether each column is a string of letters, numbers, or URLs
- Column sortable 2
- Use row filters 3
- Can calculate across columns 4
- Rows can be displayed as one page 5
By the way, I also provide a CSV viewer as free software.
The app isn't as powerful as Notion, but it's easy to use.
If you like, there is an article explaining the CSV viewer, so please check there. You can also get the app.
Article : How to make a CSV viewer app(Drag and drop)[Python] 🔗
* sorry. It's still in Japanese
Finaly
The reason I started Notion was because I wanted to use the database function.
I started by creating a definition and entered the data manually.
From the beginning, I wanted to be able to enter data programmatically using the Nption API because I thought that manually entering data would not last.
While checking the operation of the application using the Notion API, I noticed that there is an import function.
Naturally, CSV files were also targeted.
At first, I thought it was just a normal CSV viewer.
However, when I learned that the property type can be changed, and that it can also be changed to multi-select, I thought that this is the entrance to the database.
Caution
Notion is updated daily.
Please forgive me if the explanation and the actual operation are different.
This article is based on what worked under the following versions:
- Notion : Notion Services in August 2022
Please check "Disclaimer" before using.
If you have any questions, please contact me from "Contact me".
-
If there is one multi-select property, it is selected in “Group By”↩
-
Explanation of sort function : Views, filters & sorts – Notion Help Center ↩
-
Explanation of the filter function : Views, filters & sorts – Notion Help Center ↩
-
Explanation of the calculation:Aggregation(Calculations) - How to create a database in Notion [Notion database] 🔗↩
-
The date is “(GMT)”, but it’s a display problem on Notion’s side.↩